

Most of our products come with a limited warranty, covering replacement if the product fails and allows animals to enter. The products must be installed correctly, or the warranty is void, This warranty lasts the lifespan of the substrate to which the product is affixed. It is important to note that the warranty doesn't cover damage caused by external factors like a falling tree branch, which could harm the product or the surface it's attached to. These kinds of incidents are not covered under the warranty.
Guidelines for Proper Installation
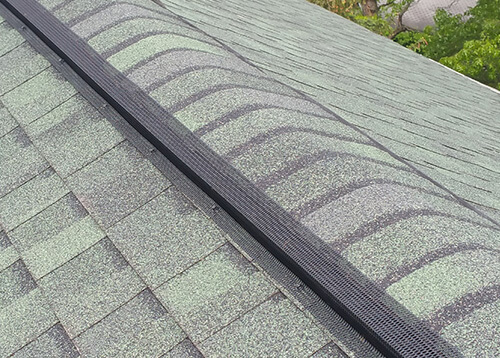
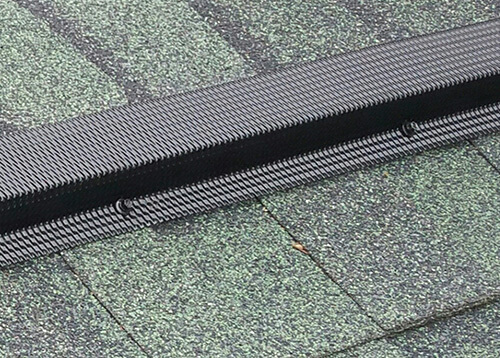
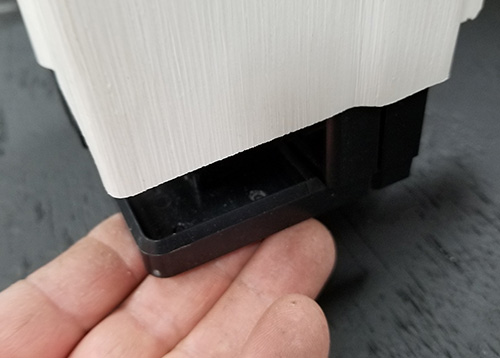
RIDGE-GUARD®:
XclusionPro® RODENT-SHIELD™:
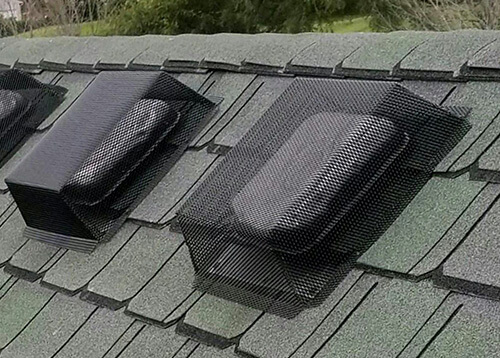
XclusionPro® XP Roof Vent Guard:
Install the XclusionPro® XP Roof Vent Guard in a manner aligned parallel to the shingles both above and below the roof vent. It is advised to avoid placing the screw tab in a manner that would result in screw holes through the flange of the roof vent whenever possible. Ensure an equal amount of space is maintained on both sides of the roof vent to center the cover over it. Once aligned correctly, use no fewer than 8 screws to secure the guard over the roof vent. Place 1 screw on either side of each corner. In specific situations, such as with thick shingles, additional screws may be necessary to secure the cover in a low shingle gap. This helps prevent small animals, such as bats and mice, from accessing the cover through the gap between the screw tab and low shingle.
XclusionPro® XL Power Fan Vent Guard:
Install the XclusionPro® XL Power Fan Vent Guard in a manner aligned parallel to the shingles both above and below the roof vent. It is advised to avoid placing the screw tab in a manner that would result in screw holes through the flange of the roof vent whenever possible. Ensure an equal amount of space is maintained on both sides of the roof vent to center the cover over it. Once aligned correctly, use no fewer than 12 screws to secure the guard over the roof vent. Place 1 screw on either side of each corner and another screw in the center of each screw tab face. In specific situations, such as with thick shingles, additional screws may be necessary to secure the cover in a low shingle gap. This helps prevent small animals, such as bats and mice, from accessing the cover through the gap between the screw tab and low shingle.
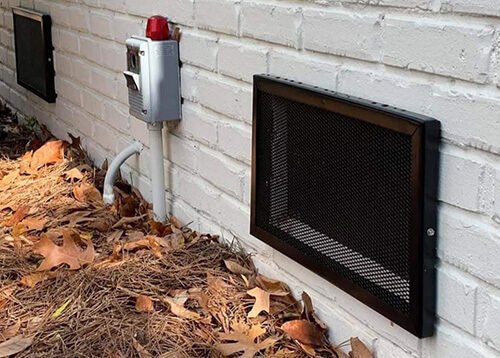
XclusionPro® FVG Foundation Vent Guard:
XclusionPro® Foundation Vent Guards should be lined up with even space around the foundation vent opening to allow for the widest variety of screw placement on the frame. Secure the frame with the provided four concrete screws, allowing flexibility in screw placement within the frame based on installer preference for efficiency. Utilize the provided concrete bit to predrill selected holes before fastening each concrete screw to the foundation. Once the frame is secured to the home, the cover can then be placed over the frame with the provided drop pins.
XclusionPro® FAD Foundation Access Door:
XclusionPro® Foundation Access Door should be lined up with even space around the foundation access opening to allow for the widest variety of screw placement on the frame. It is advised to use all 16 provided concrete screws to secure each frame, with four screws on each side. Make sure to use the included concrete bit to predrill the designated holes before fastening the concrete screws into the foundation. After securing the frame to the home, place the cover over the frame using the provided drop-in pins.
XclusionPro® LVG Louvered Vent Guard:
When used to screen a louvered vent, we recommend that the material be cut to the same width as the vent that is being screened. Secure the material by placing screws at each corner and at regular intervals between the corners. When using metal trim, it is recommended to cut the trim in a way that allows corners to be bent, allowing the frame to be made from one piece of trim when possible. This requires leaving approximately 1/8th of an inch of the material uncut at each corner and the corner to be folded in a manner that allows the metal trim to sit flush against the expanded material. When the trim is used, it is recommended that the screws be run through the trim and the expanded metal to ensure that the cover and trim are both secured.
XclusionPro® BVG Bathroom Vent Guard:
When installing the bathroom vent guard, it is recommended to utilize the supplied screws for securely attaching the guard to your home. It is best to start the screws while still on the ground and run them until they are flush with the back of the cover. After starting the screws, take the cover up the ladder and complete the installation by tightening the screws until they snugly fit against the outer surface of the cover. Ensure that the bathroom vent cover is positioned in a manner that does not impede the operation of any louvers on the bathroom vent. It's important to note that this cover is not designed for and should never be installed on a dryer vent.
XclusionPro® SignWrap™:
The intended application is for wrapping the gap at the back of commercial signage to prevent bird entry and nesting. When applied for this purpose, it is advisable to utilize the provided screws, spacing them at intervals of 12-14 inches along the sign to securely fasten the material. While it is recommended to keep the screws as close to the back edge of the sign as possible, they should not be placed closer than ¼ of an inch to that edge. The screws should be kept as close to the back edge of the sign as possible but should not be closer to that edge than ¼ of an inch. It should be noted that installation of sign wrap DOES NOT PREVENT bird nesting on the material. The intended purpose of the material is to prevent access to the back of the sign. Additional preventative measures will need to be added to prevent nesting on that material.
Rat Wrap:
When installing rat wrap, it is recommended to place the pieces onto the ridge vent in a centered manner, ensuring coverage of the entire cap shingle. Each piece should have a ½-1 inch overlap at the seam. When properly installed, Ridge-Guard will secure rat wrap to the ridge vent without the need of driving screws through the material and into the cap shingle.